Mooer Ocean Machine Midi Looper Control
November 27th, 2019 § Leave a Comment
It’s been a long time since I completed this project and teased the article on Youtube, but unfortunately I got extremely busy with work and life in general, so much that I almost forgot about it. Until a couple days ago that is, when I show a link to that video and read a couple comments asking for the article.
So, instead of an in depth analysis of what this project is and how it works, I decided to draw a quick schematic and expose the code (which had already been uploaded to Github).
Enough with the talk, let’s jump in to the juicy stuff…
What is this thing?
In short it’s a Midi Controller for the Looper of the Mooer Ocean Machine, taking advantage of it’s MIDI Capabalities, as listed on it’s Manual. It uses MIDI CC messager to control it, and it’s layout is based on the TC Electronics Ditto X2 Looper (which it replaced on my pedalboard).
It has two Buttons, one that allows you to Record/Play/Overdub (Double Click to Stop/Long Press to Clear), one to Stop/Reverse/Halfspeed (similary to the Ditto) which allows you to enter the Looper Menu by Long Pressing it for visual feedback, speaking of which, two RGB Leds, one for each button, give quick color coded feedback for the functions taking place. Of course there is a knob for the Loop Volume and a last minute addition was a MIDI In port to allow to put it between th Ocean Machine and a MIDI Enabled Looper (the switching kind)
Schematics
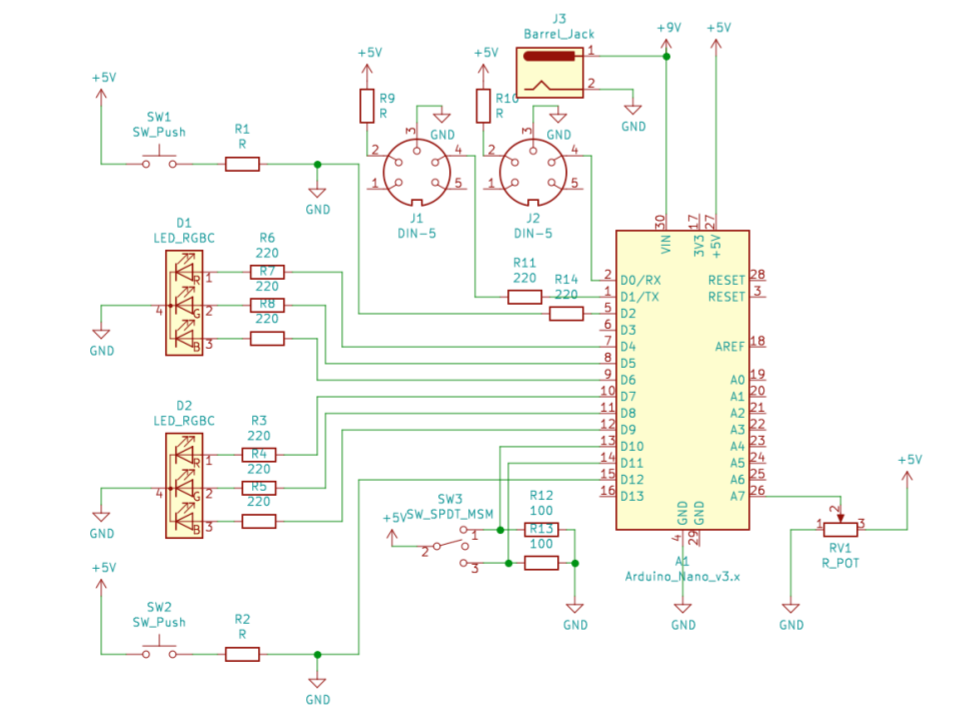
The circuit is fairly straightforward, it’s just an Arduino Nano, two buttons, two LEDs, a switch, a pot, Jack/ MIDI Connectors, and the necessary resistors. I planned to put it in sturdier metalic project box, but the plastic one it was initially installed in, proved sturdy enough, given that it was velcroed to the pedalboard. All the work is done by the Arduino Nano, which we’ll see in the next paragraph.
If you can’t figure things out by the picture above, just ask me to include a BOM.
Code
The code again is quite simple, it’s just a loop checking for the button/pot states the reads the midi input to act as a soft Thru device. It uses the Arduino MIDI Library for the MIDI functions and the OneButton Library by mathertel. Unfortunatelly, in order to allow for long presses, it was introducing a small latency, which I address on a quick and dirty update I made on Fork of the repo. The code is listed below, but you should fork it from Github in case I make any updates.
#include <OneButton.h>#include <MIDI.h> MIDI_CREATE_DEFAULT_INSTANCE(); const int greenFxLedPin = 9; // the number of the Green LED pin const int halfspeedFxLedPin = 8; // the number of the Reb LED pin const int reverseFxLedPin = 7 ; // the number of the Blue LED pin const int greenLoopLedPin = 6; // the number of the Green LED pin const int redLoopLedPin = 5; // the number of the Red LED pin const int blueLoopLedPin = 4 ; // the number of the Blue LED pin const int fxReversePin = 10; const int fxStopPin = 11; int reverseState = 0; int halfState = 0; int recState = 0; // 0: Clear, 1: Recording, 2: Playing, 3: Dubbing, 4: Stopped int looperMenuState = 0; int looperVolume = 60; OneButton fxButton(12, false); OneButton recButton(2, false); void setup() { pinMode(greenFxLedPin, OUTPUT); pinMode(halfspeedFxLedPin, OUTPUT); pinMode(reverseFxLedPin, OUTPUT); pinMode(greenLoopLedPin, OUTPUT); pinMode(redLoopLedPin, OUTPUT); pinMode(blueLoopLedPin, OUTPUT); pinMode(fxStopPin, INPUT); pinMode(fxReversePin, INPUT); recButton.attachOnClick(recClick); recButton.attachDoubleClick(recDoubleClick); recButton.attachLongPressStart(recLongPress); // recButton.attachLongPressStop(recLongPress); recButton.setPressTicks(500); recButton.setClickTicks(170); recButton.setDebounceTicks(25); fxButton.attachClick(fxClick); fxButton.attachLongPressStop(fxLongPress); MIDI.begin(1); // Listen to all incoming messages digitalWrite(blueLoopLedPin, HIGH); digitalWrite(reverseFxLedPin, HIGH); delay(1000); digitalWrite(blueLoopLedPin, LOW); digitalWrite(reverseFxLedPin, LOW); } void loop() { // Soft MIDI THRU if (MIDI.read()){ MIDI.send( MIDI.getType(), MIDI.getData1(), MIDI.getData2(), MIDI.getChannel() ); } recButton.tick(); fxButton.tick(); checkVolume(); } void checkVolume(){ int value = analogRead(A7); int volume = 60.0 - (value * 61.0 / 1023.0); if (volume != looperVolume){ looperSetVolume(volume); } } void fxClick(){ if (digitalRead(fxReversePin) == HIGH){ if (reverseState == 1){ looperReverseDisable(); } else{ looperReverseEnable(); } } else if (digitalRead(fxStopPin) == HIGH){ looperStop(); } else { if (halfState == 1){ looperHalfspeedDisable(); } else{ looperHalfspeedEnable(); } } } void fxLongPress(){ if (looperMenuState == 1){ looperExit(); } else { looperEnter(); } } void recClick(){ switch (recState){ case 0: // Clear looperRec(); break; case 2: // Playing // Overdub looperDub(); break; default: // 1. Recording 3. Overdubbing 4. Stopped // Play looperPlay(); } } void recDoubleClick(){ looperStop(); } void recLongPress(){ looperClear(); } void looperEnter(){ MIDI.sendControlChange(26,127,1); looperMenuState = 1; } void looperExit(){ MIDI.sendControlChange(26,0,1); looperMenuState = 0; } void looperPlay(){ MIDI.sendControlChange(28,127,1); digitalWrite(greenLoopLedPin, HIGH); digitalWrite(redLoopLedPin, LOW); digitalWrite(blueLoopLedPin, LOW); recState = 2; } void looperRec(){ MIDI.sendControlChange(27,127,1); digitalWrite(redLoopLedPin, HIGH); recState = 1; } void looperDub(){ MIDI.sendControlChange(27,127,1); digitalWrite(greenLoopLedPin, LOW); digitalWrite(redLoopLedPin, HIGH); recState = 3; } void looperStop(){ if(recState!=0){ MIDI.sendControlChange(29,127,1); digitalWrite(greenLoopLedPin, LOW); digitalWrite(redLoopLedPin, LOW); digitalWrite(blueLoopLedPin, HIGH); recState = 4; } } void looperClear(){ MIDI.sendControlChange(30,127,1); digitalWrite(greenLoopLedPin, LOW); digitalWrite(redLoopLedPin, LOW); digitalWrite(blueLoopLedPin, LOW); recState = 0; } void looperHalfspeedEnable(){ MIDI.sendControlChange(31,127,1); digitalWrite(halfspeedFxLedPin, HIGH); halfState = 1; } void looperHalfspeedDisable(){ MIDI.sendControlChange(31,0,1); digitalWrite(halfspeedFxLedPin, LOW); halfState = 0; } void looperReverseEnable(){ MIDI.sendControlChange(32,127,1); digitalWrite(reverseFxLedPin, HIGH); reverseState = 1; } void looperReverseDisable(){ MIDI.sendControlChange(32,0,1); digitalWrite(reverseFxLedPin, LOW); reverseState = 0; } void looperSetVolume(int position){ MIDI.sendControlChange(45,position,1); looperVolume = position; }
Conclusion
I was a nice little project to dabble a bit with Arduino and is open to many additions, now that the code for buttons, pots and MIDI is already there. It has space for more buttons and analog inputs (maybe an expression pedal?) and can be used to give access to more of it’s capabilities or adapted to other devices easily, as long there is a MIDI Implementation Chart available

Leave a Reply